
Mac OS 9 on Unsupported Systems

Most of the Apple G4 models dropped support for natively booting Mac OS 9 and only support Mac OS X. Through a lot of hard work the folks at MacOS9Lives.com have been able to get Mac OS 9 booting on most of these systems. Below is a compiled list of tutorials from my own experiences, and the others from MacOS9Lives.
Unsupported Mac OS 9 Install Disc Image
There are a number of disc images available for multiple models at MacOS9Lives.com. I recommend burning these CDs with an application such as Toast Titanium.
Note: Make sure you burn the CD at 4x speed, otherwise you may get stuck with a gray screen at boot.
CD Mirror links:
Models known to work
Mac Mini - All G4 models
PowerBook G4
Best Models: [5,1], [5,2], [5,3], [5,4]eMac G4 (1.25Ghz)
Power Macintosh G4 Mirror Drive Doors (1.25Ghz FW800)
iMac G4
Unsupported Models
PowerBook G4 Double-Layer SD models with DDR2 RAM
G5 Computers
Hardware Support
Most of these machines have newer hardware that was never available for Mac OS 9, therefore there are missing drivers and system components - not all devices will work. The most common issues are with unsupported sound cards, video cards, Bluetooth, and Airport cards. The most success has been achieved with machines that have an ATI Graphics card/chip-set. Graphics acceleration is unavailable unless you have a graphics chip-set that is officially supported under Mac OS 9.
Preparation
Before you install Mac OS 9 on your machine, your Hard Drive must have the Mac OS9 disk drivers installed. You can do this with either of the following methods:
Boot from an OSX install CD, open ‘Disk Utility’ and partition/erase your HD with the ‘Mac OS Extended’ format. Ensure the option ‘Install Mac OS 9 Drivers is ticked!
Connect the Hard Drive into a computer already running Mac OS 9 and re-partition/format it with the application ‘Drive Setup’
Booting into Mac OS 9
This is achieved by performing some modifications in Open Firmware, and tricking your machine into thinking it has a different CPU version (This does not effect performance in OSX).
Boot into Open Firmware by holding Command + Option + O + F when turning on or restarting your machine.
Once Open Firmware has loaded you will need to open the NVRAM editor by typing
nvedit, and then press Enter.
dasdasdOpen the CPU device by typing the following:
dev /cpus/PowerPC,G4@0then press EnterMake the following modification to the cpu-version property:
80010201 encode-int " cpu-version" propertyEnter
device-endto close the CPU device.Press Control + C to close the NVRAM editor.
Note: If there is text present after you open the NVRAM editor, these are settings that are already stored. You can either clear this by holding the delete key, or press the down arrow key for a new line, then you can start typing. When you open the editor you can think of it like you're viewing a document, but you're only seeing one line at a time. You can scroll through lines with the arrow keys. Once you're on a blank line you can enter any settings you'd like to add.
Performing the above only allows you to boot into Mac OS 9 temporarily. These commands need to be stored in the NVRAM so they persist between boots. Running the commands below will store this information in the NVRAM and restart the machine.
nvstore
setenv use-nvramrc? true
reset-all
Your machine will restart and you should now be able to boot from the Mac OS 9 For Unsupported G4’s CD from MacOS9Lives.com.
Any data stored in the NVRAM will be erased if the machine loses power (e.g. the main power cable is disconnected from a wall outlet/power adapter, or has a flat battery. Since this is a lot to type each time you lose power, a better way of performing the above is to write everything into a script, and tell Open Firmware to run it at boot. Now if you lose power you only need to remember one line to enter into Open Firmware.
Writing an Open Firmware Script
Open Firmware Scripts can be created with the application ‘SimpleText’, or any other text editor that will allow you to save .txt files without any rich text content. Open SimpleText and add the following to your new document.
\ comment
cr
dev /cpus/PowerPC,G4@0
80010201 encode-int " cpu-version" property
device-end
boot hd:,\\:tbxi
The beginning of the script must contain an Open Firmware \ comment, followed by a carriage return cr.
The last line sets the boot device to the default HD so the machine continues to boot after running the script.
Save the file to the root/base directory of your hard drive and call it ‘bootscript’.
Some machines have incompatible sound cards and will crash or refuse to boot OS9 after the above steps have been taken. If this happens try adding the following to the NVRAM, or your script.
Screamer sound card fix:
dev /pci@F2000000/mac-io/i2s/i2s-a
" screamer" encode-string " compatible" property
device-end
A full boot script example:
\ comment
cr
dev /cpus/PowerPC,G4@0
80010201 encode-int " cpu-version" property
device-end
dev /pci@F2000000/mac-io/i2s/i2s-a
" screamer" encode-string " compatible" property
device-end
boot hd:,\\:tbxi
Mac OS 9 does not have good thermal management for unsupported systems. If you're worried about elevated hardware temperatures under Mac OS 9, see the article Controlling System Fans with Open Firmware. You can combine both scripts to make things easier.
Installing from the Mac OS 9 Lives CD
After booting successfully into Mac OS 9 you will need to install the system onto your hard drive. It’s a good idea to erase your HD with ‘Drive Setup’ if you don’t have anything important on it already.
If you install from one of the Mac OS 9 Lives CD images start the restore process and follow the instructions. Once the restore process has completed DO NOT restart your machine.
From the desktop, open HD > System Folder > Extensions and find the ‘Multi Processing’. Remove this folder by moving it to your desktop or to the trash. The extension(s) within this folder causes some incompatibilities with the unsupported systems and result in freezing during the boot process.
If you install from any other CD/image the same steps are recommended.
Once the system is installed and you have removed the ‘Multi Processing’ folder, restart the computer.
Video/Monitor Settings
When you've booted into the newly installed system you may be stuck with a small screen resolution.
Your machine may also boot to a gray screen showing no desktop icons. If this happens, try pressing the F7 key with the two squares icon (on a PowerBook) to change the screen arrangement.
If your machine has an ATI Graphics chip-set it is highly recommended that you add this driver modified by darthnVader (alternative link) from Mac OS 9 Lives. This adds better compatibility with more resolutions and color depths. Expand the file with Stuffit Expander and move the extension to your ‘Extensions’ folder, which is located in the System Folder, then restart the computer.
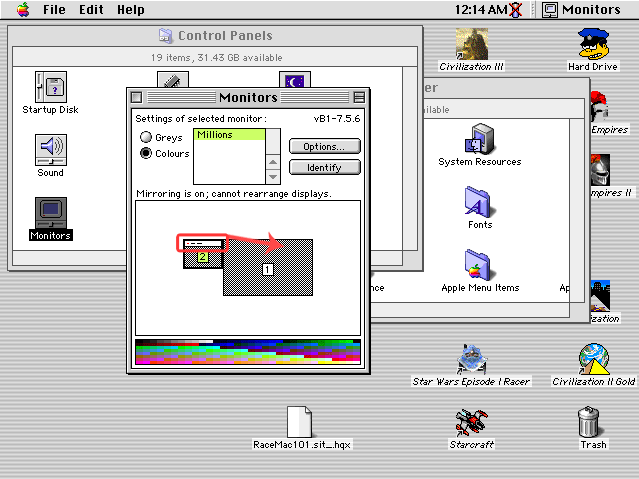
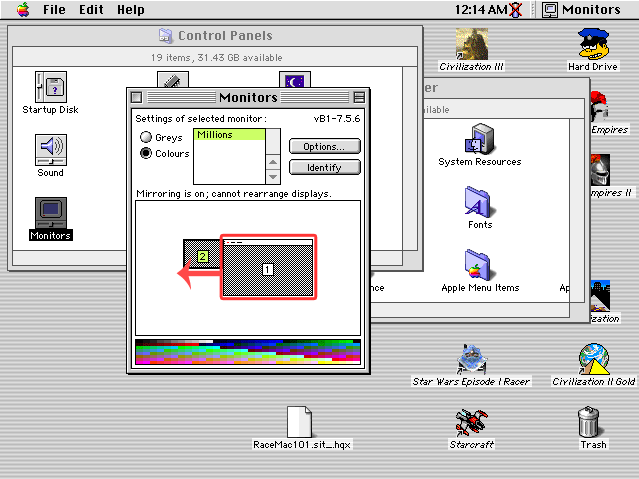
If you've still got a small screen resolution, or limited colour set open the ‘Monitors’ control panel and adjust the monitor arrangement. First drag the menu-bar from the smaller screen to the bigger screen. This sets the default desktop. Next, change the screen arrangement by moving #2 to the left before #1.
Woohoo!
You should now hopefully have a working Mac OS 9 system!
An enormous thank you to the people below for making all of this possible, and for other help along the way:
iMic
And many more from the MacOS9Lives forum!
Make sure you check out and join the MacOS9Lives forum. They have a huge wealth of knowledge and are the best Mac OS 9 devoted community around. None of this would have been possible without them!
Related Pages

|
Open Firmware Basics and Commands16 January 2020
References for Open Firmware commands and other general resources. |

|
Open Firmware Scripts02 May 2020
Writing Open Firmware scripts is a useful way to simplify modifications and provide an easier way to invoke complex instructions. |
Comments
Gerry Schultz
05 April 2026
A side question. I have an iMac G5 with a 20" display and 2GHz G5. When this iMac was new it was only supported by 10.4 an 10.5. I have both installed on my system SSD so I can run 9.22 under 10.4. Is there a way to add another partition to directly boot into 9.22? Thank you, Gerry
PermalinkGreystash - Admin
07 April 2026
Hi Gerry,
Unfortunately this only works on G4 machines. G5s are unsupported as their hardware and architecture are vastly different from the G4s which natively supported OS9. Mac OS X 10.4 runs OS9 under emulation through the Classic Environment. This is different to running an operating system natively, and is the reason why the Classic Environment has poorer performance/support of software when compared to OS9 being run natively.
PermalinkLater model G4s were intentionally prevented from running OS9 by Apple, when support could have easily been added, and this is what this hack enables. G5s are a giant technological leap into a different direction, and there is zero system/driver support within Mac OS 9 to support the newer hardware, so running it isn't possible.
Vasili
16 March 2026
I followed your instructions and added the commands to nvram, but when i try to boot into macos9lives dvd, it stays on the gray screen for a moment, and then it just shuts off. I applied the screamer card fix, but the problem stays. I think the problem is because i burned the iso to a dvd-rw.
PermalinkGreystash - Admin
24 March 2026
That could be it, I find that burning a CD with Toast is the most reliable method to get a working boot CD. What type of machine are you trying to boot this with?
PermalinkVasili
25 March 2026
I use Powerbook 5,8, the final 15” model.
PermalinkGreystash - Admin
07 April 2026
If you can't boot the CD then the only issues I can see would be:
The NVRAM code is invalid
The CD wasn't burned correctly (e.g. correct Mac format, burned with Toast on an older Mac etc.)
Check your NVRAM code again, and ensure it's exactly the same as the example above. Note the spaces preceding device names like "[SPACE]cpu-version", "[SPACE]screamer" are important etc.
Also try with and without the screamer fix. If that fix doesn't apply to your machine then it could cause issues if you're trying to apply it.
Otherwise, after you've booted into Open Firmware, navigate through the device tree to see if the location of the "screamer" device is the same as in this example. E.g.:
Or
These list the child devices underneath the device you're specifying, where
/is the root/top level device.Once you're in side a device (e.g.
Permalinkdev /pci@F2000000) you can type.propertiesto view names/values of the selected device.Vasili
07 April 2026
I think that it cannot boot because the final powerbook models had ddr2 ram.
PermalinkGreystash - Admin
10 April 2026
Ah that makes sense! Thanks for the update I'll note that on this page.
Permalinkarceus
21 November 2025
i'm trying to do the stuff in open firmware but when i do nvstore i get "nvramrc not valid" after rebooting and trying to boot into the cd it's still a gray screen and it hangs (i am using a 1.25gz emac)
PermalinkGreystash - Admin
27 November 2025
It sounds like there's an error in the commands you've saved to the NVRAM. If you're getting a not valid message it usually means it can't evaluate what you're telling it.
Try running `nvedit` and clearing everything/every line, and then apply the the hack again. Be careful to enter every line exactly as it is below:
Then run the commands:
PermalinkPootie
28 September 2025
Does this work with a 15inch a1095 PowerBook g4 5,4? I’ve followed everything multiple times and boot from cd with only grey screen. I want to keep trying but if it’s not possible don’t wanna waste my time.
PermalinkGreystash - Admin
28 September 2025
I believe it should work, I've had it working right up to the 1.67Ghz models. Have you tried the screamer soundcard fix (the last block of example code in the post)?
PermalinkPootie
29 September 2025
I finally got it to boot and install on my PowerBook G4 5,4. I burned tried 3 different burning speeds and finally got past the grey screen when I burnt at 4x and held C at boot. Thank you for your help!
PermalinkGreystash - Admin
30 September 2025
That's great! I'm glad it was a simple fix. Thanks for letting me know, I'll add a note to this page.
PermalinkRASTIQ
30 August 2025
Hi, I've been trying to follow the instructions to install Mac OS 9 on my 1.25 eMac. I've successfully formatted my disk with Mac OS 9 drivers (even though the Mac OS X 10.2 installer probably didn't have screen drivers) and burned the MacOS9Lives "Unsupported G4s" image on a CD. However, when I boot on the CD after typing the commands on OpenFirmware, I get stuck on the gray screen, with a diskette icon and a blinking question mark. What does this mean and what am I supposed to do? Are the drivers for the CD/DVD drive missing?
PermalinkGreystash - Admin
28 September 2025
Hi, and sorry for the slow response!
I'm not too sure I haven't tried with an eMac before, but my first guess would be that it needs the screamer soundcard patch (in the last code example), or something may be slightly off in your NVRAM code.
Otherwise I would highly recommend visiting the MacOS9Lives forum, they will have a dedicated eMac page. Now that I think about it, you may actually need a different boot CD (from MacOS9Lives), I think some of the Mac Minis and eMacs require a slightly different Mac OS ROM.
PermalinkBolkonskij
06 December 2023
Greystash, do you have any further details as to what iMac G4 model fully support the patched OS9? I've heard varying news about compatibility and the extent of compatibility.
PermalinkGreystash - Admin
06 December 2023
Hey Bolkonskij,
A while back I did some testing with a 1.0Ghz 15" but stopped after I couldn't get video acceleration. The GeForce4 MX was supported in Mac OS 9, but the chipset is slightly newer (NV18) than the one supported by the Mac OS 9 drivers (NV17) - thanks to darthnVader for this info. I believe the system was still usable but I haven't booted it for over a year. It's sitting out at the moment so I'll fire it up in the weekend if I get time.
I did have a 1.25Gz 17" but unfortunately sold that before I found the work by iMic and Mac OS 9 Lives!
PermalinkRetter Von Dunkel
18 November 2023
Good afternoon, you have a fantastic site, the truth is that it has a lot of useful information, I have a problem that is driving me crazy, I am following all the steps that you indicate to install on a completely clean disk of a Powerbook G4 model M9422LL/A - PowerBook5 ,4 - A1095 and I get the CD to start, but the screen remains gray, and I can't get past it. I would appreciate any help.
PermalinkGreystash - Admin
18 November 2023
Hi Retter, thank you very much!
When booting unsupported machines Mac OS 9 often thinks there are two monitors attached, and incorrectly assigns the wrong one as the default monitor. Try pressing the F7 key (with the two squares icon). This should switch monitors, then you can open the Monitors/Monitors & Sound control panel to redefine the screen arrangement.
If pressing F7 doesn't help, try connecting a second monitor to the DVI port and performing the same steps. See the images at the end of the article for more detail on how to do this.
PermalinkI've also updated the article to note this (thanks for your reminder!).
Retter Von Dunkel
18 November 2023
No, it works, I have tried it with different disk images, and I can't get past the gray screen. I don't know what I could be doing wrong. Could there be something wrong with the Open Firmware? I do not know what to do
PermalinkGreystash - Admin
18 November 2023
Ah right, do you see the "Happy Mac" at all when trying to boot?
You will probably need to apply the "screamer" fix if you haven't already. The full statement you save in the NVRAM editor should look something like this:
PermalinkRetter Von Dunkel
19 November 2023
Now we are on the right track, but there is a problem, because when the east side that says 9.0 appears and the transport bar reaches the end, it freezes, and the mouse does not work, I have tried with the extensions disabled and the same thing happens.
PermalinkRetter Von Dunkel
19 November 2023
Thank you very much, thanks to your instructions I have managed to install the system, it has some strange things, I see as if the video acceleration does not work and the adio does not work in any way, it is as if it does not detect the internal interface
PermalinkGreystash - Admin
19 November 2023
No problem. The freezing is usually due to the Multi Processing folder not being removed before booting, in which case you boot from the CD again and remove it.
That's right, there's no video acceleration on these models since there were no drivers/support added for Mac OS 9 with the GPUs used in these machines. The sound issues are occurring for the same reason.
The best models I have used are the `M8793LL/A` (1.0Ghz 17"), and the `A1046` (1.0Ghz 15"). These models have full sound, trackpad support, and good GPU support with darthnVader's ATI extension. The only problem with all models is that sleep is unsupported due to there being unrecognized hardware devices. I have been trying to find a solution to this but haven't had any luck yet.
PermalinkRetter Von Dunkel
21 November 2023
With the Darth Vader ATI extension the screen goes completely black
PermalinkGreystash - Admin
06 December 2023
Hi Retter,
PermalinkApologies for the delayed response. That's interesting.. Have you tried removing all NVIDIA extensions, and also some/all of the existing ATI extensions?
Cyberish
21 April 2023
Hi Greystash! I just sumbled accross your great website! Thank you!! When trying to boot OS 9 from an external FW hdd, I guess to have to change also the name
Permalinkusb0tofw0?setenv boot-device usb0/disk:2,\bootscriptAnd in your bootscript you should replaceboot hd:,\\:tbxiwithboot usb0/disk:2,\\:tbxi, but with your FireWire device ID/partition number." best regardsGreystash - Admin
21 April 2023
Hi cyberish! Thanks for the kind words I'm glad you've found it interesting!
I haven't setup external boot devices for a while now but I believe you are correct with the structure of these commands, although your device ID may be different.
In another article (Changing the boot device with Open Firmware) there is an example for booting from USB devices, which is the same as what you have. Booting from a FireWire device should be the similar although you should view Open Firmware's device tree with
devaliasto find the device ID of your FireWire drive.Some computers have different device names based on their port configuration. For example, my PowerBook G4 Ti has the devices
fwandfwx. I'm assumingfwis for the single FireWire port but I'm not sure whatfwxis for. It has two USB ports so theusb0andusb1devices are both present.Let me know how you get on :)
PermalinkCyberish
23 April 2023
thank you Greystash for the HDD hint! - I got my Powerbook 6,2 booting into OS 9 but it hangs and freezes just before completing the boot process, before getting to the Desktop. - The same occurs even with Extensions and Control Panels off... - I had this very computer working once with the "unsupported MacOS9Lives" Cd. (There is a little hick on this page : it should be "reset-all" (not " reset all" !)
PermalinkGreystash - Admin
23 April 2023
Glad to hear you got it booting! After installing from the MacOS9Lives CD did you remove the Multi Processing folder from Extensions? Leaving this within the system folder will crash the boot process. Maybe this is seen as an essential part of the OS and loads even if extensions are disabled.
If you can boot from the MacOS9Lives CD it means that there is probably something wrong with your system folder. It might be worth trying to re-install from the CD, and then removing the Multi Processing folder before rebooting.
Thanks for letting me know about the typo! I've just fixed that up.
PermalinkCyberish
23 April 2023
This is it! Removing the ‘Multi Processing’ folder did the job. Thank you ! For what reason the ‘Multi Processing’ folder is still in the System Folder on the MacOS9Lives distribution? Will post over there too...
PermalinkGreystash - Admin
26 April 2023
I'm not sure but it has been brought up previously, although I can't remember what the outcome was. That's great you've got it working now!
PermalinkMacadamia - No user information has been added yet.
15 December 2022
Hey greystash, thank you so much for all the hardwork you've done here. =) I've got an FW800 I've managed to get to boot OS9, but it won't boot back into an installed/working Tiger partition afterwords without a PRAM reset. Tiger and OS 9 are on separate HDDs, both ERASED with OS 9 drivers using a Leopard install DVD. Neither drive larger than 120GB. I used the MacOS9Lives disc to install, and same thing happens after booting from that too! Setting the startup disc in the OS9 control panel to Tiger didn't seem to help. :/ Any thoughts?
PermalinkGreystash - Admin
15 December 2022
Hello! No worries, but I can't take credit for all the initial work that got us to this point - that goes to the folks mentioned on this page.
Great to hear that you've got it all set up!
I've got the same setup FW800 1.4Ghz with 2x SSDs (one OS9 and the other Tiger). I don't have any issues selecting boot drives after restarts etc. but I know that SATA adapters can influence this a lot.
On the ATA66 Bus I have my OS9 SSD connected, and no other devices attached. This is the SATA adapter I'm using and it's set to Master.
My OSX drive is connected to the IDE bus closest to the CPU and uses this SATA adapter. I'm not sure which jumper setting this defaults to since there are no pins to bridge, I'm guessing it's either Cable Select or Slave? Again there are no other devices connected to this cable.
What sort of hard drive adapters are you using (if any)? I previously used different adapters and after restarting OS9 I could never boot into OSX, but it would work if the machine was completely shut down, and then turned on again. After holding the option key to bring up the boot selector I could then choose the OSX drive and it would boot. Restarts would never work, it would always boot the OS9 drive. The combination I am now using works well and I haven't had any issues with these adapters.
This probably isn't going to help but you could try this alternative Startup Disk version and see what happens.
Hopefully this helps. If you want more details on my setup let me know, I am happy to help!
Permalinkumikaoru
15 November 2022
Where can I get Monitors vB1-7.5.6?
PermalinkGreystash - Admin
15 November 2022
I have the 7.5.6 version here, but if you're after the beta version I assume this would be found within a 7.5.6 beta system update.
PermalinkSteph
21 September 2022
Stupid question, I made a script but what about "you only need to remember one line to enter into Open Firmware"? My mac see my OS9 partition when I click option at start but I got agrey screen if I try too boot, script or not. eMac 1.25ghz by the way, thanks in advance!
PermalinkGreystash - Admin
25 September 2022
Hi Steph,
The line you need to enter into Open Firmware is this:
The boot script should be a plain text file (txt) created by SimpleText, and the name in the command above should be whatever you named the script file.
It's likely you're getting stuck on the grey screen because the boot script isn't being read. The script is what tells Open Firmware to modify the CPU version which enables Mac OS 9 to boot. You will also need to make sure your HD is formatted correctly for OS9 to run.
See more on setting up the boot script here.
I haven't tried this on a 1.25Ghz eMac but it should work fine. Best of luck!
PermalinkSteph
25 September 2022
Hi, thanks for the answer! I did that already, I found the info here. My partition is on an external firewire drive, no luck. Do I need to replace "hd" by "disk1s2" for example? I'm almost there, frustrating, thanks in advance.
PermalinkGreystash - Admin
30 September 2022
I haven't actually tried this on an external disk before, but I have used a partitioned drive.
hdis an alias for the internal disk and it seems to search all partitions for the script. I would assume that swappinghdfor your disk identifier would work, but I'm not 100% sure as I haven't tested this.When you're setting the boot device/pointing to the bootscript in Open Firmware you would replace this with something like the following (this is an example with a USB device ID, so replace it with your FireWire device ID and partition number):
And in your bootscript you should replace
boot hd:,\\:tbxiwithboot usb0/disk:2,\\:tbxi, but with your FireWire device ID/partition number.If that doesn't work you might be limited to using an internal disk. I'm interested to hear how you get on!
PermalinkSteph
13 October 2022
It's working, just quite unstable and I have a lot of privileges problems, OS9 games are on the X partition, I can live with it, thanks!
PermalinkGreystash - Admin
16 October 2022
Glad to hear you got it working!!
PermalinkTKM1
02 May 2022
Hey, followed the guide for a Powerbook G4 (5,2) but after installing the ATI drive, when OS 9 boots, it now just freezes. It boots, gets to the desktop then freezes, cant moving anything but the mouse cursor. Any idea why?
PermalinkGreystash - Admin
02 May 2022
I've come across this also and I think there's a bug involving some of the ATI drivers. Try this:
After booting wait at the desktop for a while in the frozen state. After waiting, open the Force Quit prompt (command + option + Esc). The prompt should ask you to force quit an ATI utility (because this is what's currently hanging the system).
If you don't get this wait a little longer after the next restart.
Once you've booted successfully into the system, disable all NVDIA drivers, and try disabling/toggling some ATI drivers. I can't remember which one causes the issue but it's not going to make much difference disabling some/all since GPU acceleration isn't available anyway. The modified Jasper driver is essential for screen resolution and color support.
PermalinkRoman
23 January 2022
Greystash, Ok I tried the above script for the PowerBook G4 DLSD and though it is visable when I hold down the option key, once it loads the computer just goes off, meaning it shuts off. I have feeling the video chip may not be compatible with OS 9 at all. I need to know if you were able to get OS 9 to boot off the last G4 PowerBook Dual-Layer Superdrive models. I tried the screamer and it would not work either. Perhaps the last model G4 DLSD 17 and 15 inch DDR2 models are not working due to the video and or DDR2 memory ?
PermalinkGreystash - Admin
29 January 2022
Hi Roman. After checking my model I noticed that it's not the DLSD model, instead it's the PowerBook 5,6.
If yours crashes immediately after selecting the boot device then I would assume it's an issue with incompatible RAM (DDR2). I don't think there were any machines supported by OS9 that used DDR2 memory.
If the system begins loading, and then crashes then it could be a video issue. The GPU is unsupported but may work with the modified ATI driver made by darthnVader from MacOS9Lives. This would need to be moved to the Extensions folder of the System Folder you are trying to boot.
Good luck!
PermalinkRoman
19 January 2022
Will this ever work for a G4 PowerBook DLSD 15/17 inch ? That is 5,8 PowerBook G4 15 INCH.
PermalinkGreystash - Admin
21 January 2022
Hi Roman, as far as I'm aware it does work with the screamer fix mentioned above. I managed to get it working on an overclocked 1.8Ghz model (1.67Ghz 15" model although I can't remember if it was DLSD).
PermalinkThe main issue is that these later models have a USB track pad that is unsupported by OS9, so the tracking is incredibly slow making it barely usable. If someone were able to write a driver for this it would be by far the best portable unsupported Mac OS 9 machine. If you're willing to use a mouse instead it would be fine.
abdalwahab orabi
02 June 2021
i flow you instructions on my ibook 12 early 2004 and i works great except screen resolution stuck at 640*480 ant the link you provided is broken and i can not fix the screen resolution
PermalinkGreystash - Admin
07 June 2021
Hi there, I've edited the page to explain the monitor/resolution problems in more detail. I've also added an alternative link for the video driver, so see above for these edits.
Permalinkabdalwahab orabi
02 June 2021
speakers working great but screamer fix can not open the link because it is broken is there any other link or way of explanation by the way "you may be stuck with a small screen resolution. If this happens open the ‘Monitors’ control panel and adjust the monitor arrangement. Try swapping the right-hand screen over to the left etc. To change the default desktop, drag the menu bar across to the desired screen." i did not understand what you mean
PermalinkGreystash - Admin
07 June 2021
If the speakers are working fine then it's likely you won't need the screamer fix. If they aren't functioning correctly you don't need to download anything, just add the screamer fix code detailed above to your Open Firmware script.
PermalinkRetroDelirium
29 May 2021
I followed your guide and now have a working MacOS9-capable eMac 1.25GHz! The sound only comes out from one speaker though, i don't know if a fix exists.
PermalinkGreystash - Admin
29 May 2021
Hi there! That's great news! Do both speakers work correctly under OSX?
If they do it might be a driver compatibility issue under OS9.
If you haven't tried the "screamer" fix mentioned above you could try that, otherwise if it's already present in your script/NVRAM you could try removing it.
Also, this probably isn't the issue but check the speaker balance in the Sound control panel.
PermalinkIrene
23 February 2021
Wow :) !
PermalinkPost a Comment