
iMac G3 Dual Bootable SSD Setup
Getting set up with a high capacity (128GB+) solid state drive (SSD) can be tricky with an iMac G3. There's no native support in G3 machines for drives larger than 128GB in size, so if you install a drive exceeding this size it either won't be recognised or it will only be possible to format it as a 128GB drive.
To work around size limitations you can split your drive into partitions.
Formatting a solid state drive must be done in another Macintosh computer that is capable of installing the "Mac OS 9 Drivers". Mac OS 10.5 (Leopard) is the last OS X system that supports installing the required disk drivers.
You must also install the drive internally. Disk Utility won't give you the option to install the disk drivers if it's connected by USB. I use a Power Mac G4 MDD when formatting new drives.
Formatting an SSD
If you're formatting the drive using a Mac OS X capable machine, open "Disk Utility". Select the drive and click the Partition option. Before formatting the drive, click the Options button and ensure "Apple Partition Map" is selected as this is the intended format for PowerPC computers.
If you're using a Mac OS 9 machine, you can follow the same steps using the utility "Drive Setup".
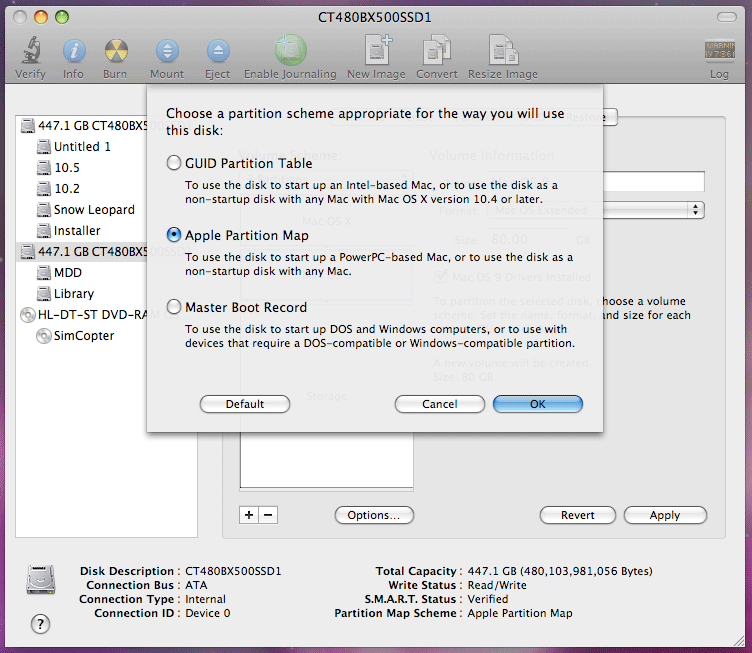
Check the partition type is set to Apple Partition Map |
Dual Bootable OS9 and OSX System (multi-partitions)
Creating a dual bootable OS9 and OSX iMac on separate partitions isn't as straight forward as it is with other computers. Mac OS X on iMacs (G3, G4) in particular seem to be more picky with drives/partitions than Mac OS 9.
Allocate the first partition to Mac OS X. Using the second partition for Mac OS 9 will allow you to dual boot both systems. Note that both system partitions must be under 128GB in size. I have tested this successfully using 80GB partitions for both volumes.
With the remaining space you should decide whether you want this allocated to Mac OS X or Mac OS 9.
If you need it for Mac OS X you will need to create however many more partitions you need, but they must not exceed 128GB otherwise they won't mount under Mac OS X.
Mac OS 9 doesn't seem to care about drive size unless it's for a bootable volume. If you already have your Mac OS X and Mac OS 9 partitions, you can assign the remaining drive space to a single partition and it will be visible/accessible under Mac OS 9, but not Mac OS X. Alternatively, split them into 120GB volumes for use with Mac OS X.
Click the Apply button to begin formatting the drive.
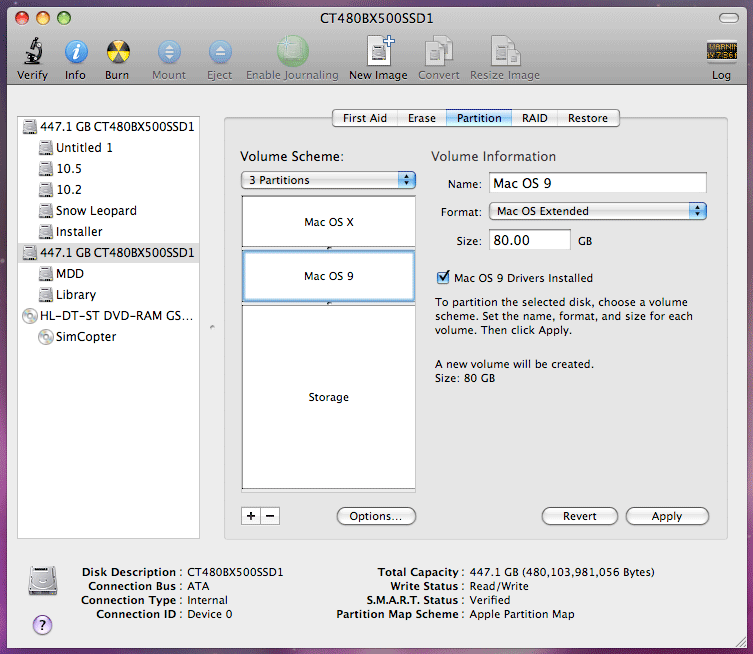
1x OSX volume |
System Install Process
Install your Mac OS X system first. If you want to avoid issues such as "Catalog BTree" issues with your Mac OS 9 volumes, DO NOT access them when you're using Mac OS X. I find it helps to turn off Hard Drives from appearing on the desktop (In Finder Preferences), and instead create an alias to the OSX drive and place it on the desktop.
You should also disable Spotlight if you have installed Mac OS X 10.4+. Spotlight wreaks havok on Mac OS 9 volumes and will eventually create disk errors. You can disable Spotlight by following these steps:
- Launch Terminal and type the following command:
sudo nano /etc/hostconfig
- Scroll to the bottom with the down arrow key to the following entry:
SPOTLIGHT=-YES-
- Change this to:
SPOTLIGHT=-NO-
- Save your changes by pressing Control + O, then press the return key. Next press the key combination Control + X to close the editor.
- Next, disable indexing by typing:
sudo mdutil -i off
Installing Mac OS 9
After installing OSX and disabling Spotlight you can restart your machine and boot from your Mac OS 9 installer CD. When the system has started, at the desktop select the drive(s) you have allocated to Mac OS 9 and click the Special menu, then Erase Disk. Select "Mac OS Extended" and erase the volume. This ensures you are starting with a clean drive that Mac OS X has not touched, and if you've followed the previous steps it should not ever touch them.
Run the Mac OS 9 installer to setup your system. When the installation is complete, restart your machine. You may notice that a flashing floppy disk with a question mark appears for ~30s, and then the OS9 system will be found and continue to boot. This is a quirk of using IDE > SATA adapters in the older iMacs. After booting into Mac OS 9, open Startup Disk and select the Mac OS X drive, then restart to confirm your dual booting system has been set up correctly.
Choosing Which System to Boot
When turning on your iMac, hold the option/alt key to bring up the boot picker. This allows you to choose which system to boot when starting your machine. You can also assign the default system to boot within Startup Disk of both systems.
This setup was tested using an iMac G3 Snow (600Mhz), 512GB Apacer SSD, IDE > SATA adapter, Mac OS X 10.2, Mac OS X 10.4, Mac OS 9.2.2.
Comments
Sean
27 July 2024
Hey if you don't have a power mac can formatting be done any other way like with linux?
PermalinkGreystash - Admin
03 August 2024
Hey Sean,
PermalinkThe thing you need to ensure is that you are formatting the drive in a way that will also install the Mac OS 9 drivers. I'm not sure how else you can do this, but you could look at doing it through emulation/running OSX 10.4 in a virtual machine?
Gustav
15 January 2024
Exactly which SATA-IDE adapter was used? I have bought several and none of them let me boot from the SSD on my iMac G3 700mhz
PermalinkGreystash - Admin
15 January 2024
Hi Gustav,
I've used both this adapter, and this one. Both have worked well for me. Note that with these installed you will probably see a floppy icon with a flashing question mark for 30s - 1minute before it will boot. I haven't figured out why it takes so long to find the SSD yet, but it boots and works fine afterwards.
PermalinkPost a Comment