
Setting up modern email for early Mac OS 8.0 - 9.2.2
26 June 2020
Setting email up under Mac OS 9 and earlier has become much more difficult with modern security standards, however it is still possible. To setup an email account you will need your own domain name, email host, and an SMTP delivery service.
Prerequisites
Domain Name
A domain name is a reference pointer that is typically attached to a website. As an example, 'example.com' is a domain name. In this guide you will need to purchase a domain name which typically cost between $10-$30/year. If you don't need a .com domain you can get free domains from Freenom. For the purposes of this guide It is not necessary to connect your domain to a website. It's not needed but you can point your domain name to a website at any time in the future if needed.
A domain name can be registered at a domain registrar such as Namecheap or Freenom.
Email Hosting
You will also need to use an email hosting service. An email host is a service that lets you create an email account (bob@yourdomain.com), stores your emails on their servers and sends your emails to other addresses.
I have chosen to use MXRoute because it's one of the cheaper email hosting options, it's easy to use, and they provide excellent service and support. The beginner plan costs $30USD/year which lets you use an unlimited number of domain names, and offers 10GB storage. They also offer a lifetime plan with a one-off payment option.
SMTP Delivery
SMTP is the protocol used for sending an email to another email address. MXRoute and most other email hosts use servers that enforce strict security protocols for SMTP (sending emails) on their servers. This means that you will be able to receive emails, but not send them because Outlook Express doesn't understand the newer security protocols.
SMTP2Go are and excellent choice to work around this issue and can handle all of the outgoing messages for your email account.
Note: If you're going to use email under Mac OS 9 you must be aware that all email transmissions are insecure. There is currently no way to implement modern security protocols with this system.

|
|

|
Services Setup
- First you need to register a domain name. You can do this at Namecheap or any other domain registrar
- Next create an account at SMTP2Go
- After logging into SMTP2Go's website, go to Sending > Verified Senders in the sidebar, then add your sender domain (the domain name you registered earlier).
- You will be given three CNAME records that you need to add to your domain's DNS settings. Go to Namecheap, or whichever domain registrar you used to register the domain name with, and add these records to your domain's DNS records.
After you've added the DNS records, go back to SMTP2Go and click the Verify button to check you've set them up correctly. Once they're verified they should look like the image below.
- Go back to your SMTP2Go account and navigate to Sending > SMTP Users within the sidebar to add a user. I recommend making your username and password the same as what your email account will be, this helps to avoid confusion when setting things up within Outlook.
Example:
username: bob,
password: the same password used for your email account
- Create an account at MXRoute or any other email hosting service - the following steps assume you have chosen MXRoute
- On MXRoute create your first email account and take note of the following:
- Your new email address
- Your password for the email address
- The server used for the mail account e.g. blizzard.mxrouting.net
- When you create an email account on MXRoute, you will be given the DNS records that need to be added to your domain on your domain registrar's DNS records (as explained in step four). Depending on what plan you signed up for with MXRoute you may be given multiple records. When setting up my account I only needed the DKIM key which is a TXT record.
An example looks like this:
Name:x._domainkey
Type:TXT
Value:"v=DKIM1; k=rsa; p=SBGOSEOBUGSIH#@&TGHKSKJBEILF......"
TTL:3600
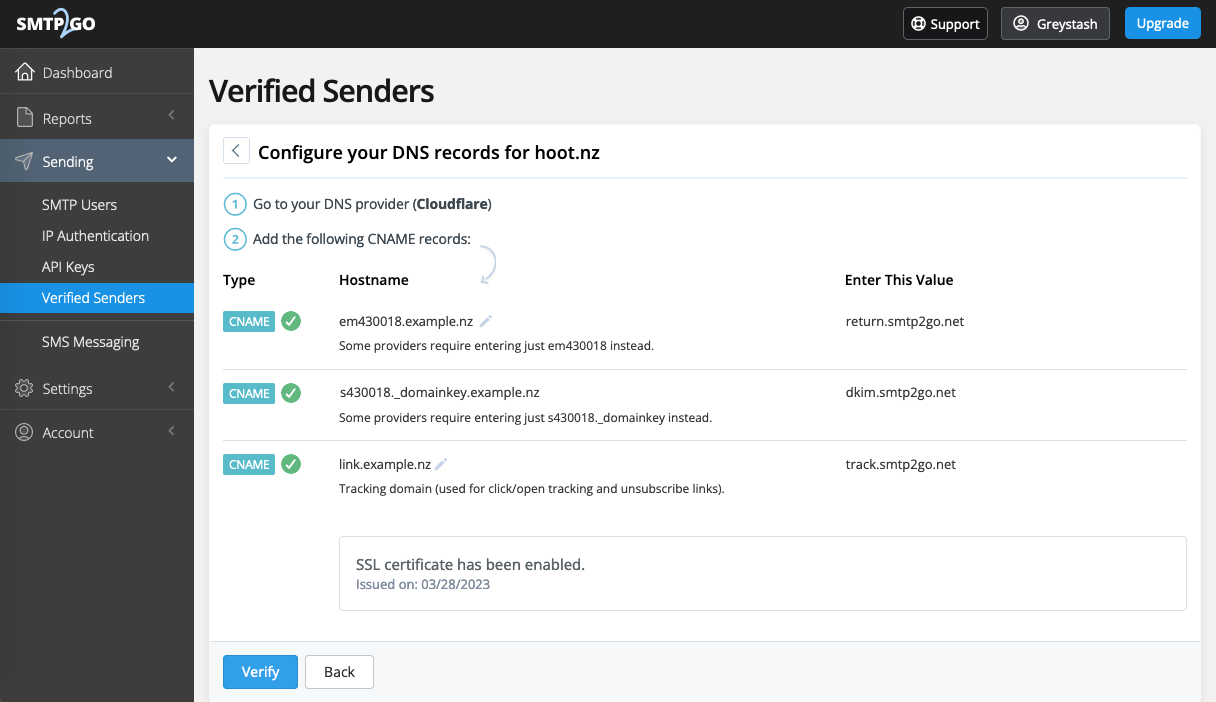
Successful DNS setup |
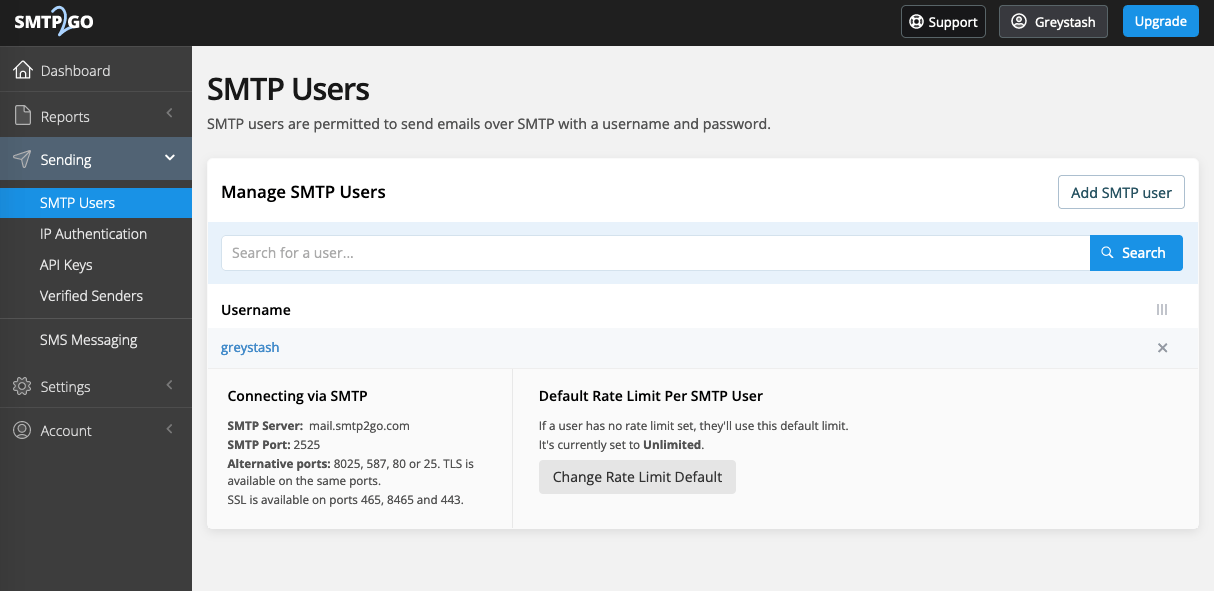
User setup |
Outlook Express Setup
After completing the above you can now set up the email account in Outlook Express.
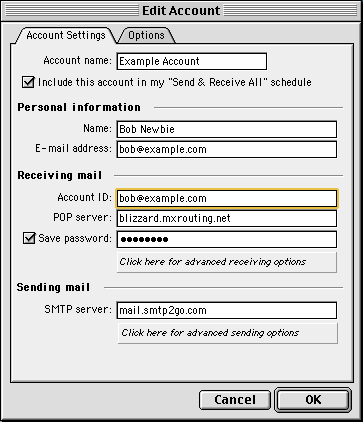
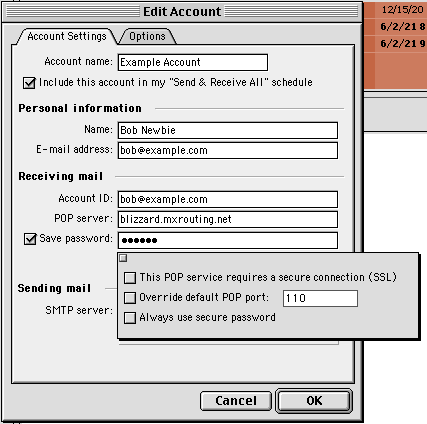
- Go to the accounts preferences and create a new account. Make sure you select the option to Configure Manually and to choose the POP protocol for receiving mail. Enter all of the relevant personal information (Account name, Name, Email address)
- Receiving mail settings:
- Enter your email address as the Account ID
- Enter the server name you were given from MXRoute as the POP server e.g. blizzard.mxrouting.net
- Enter the password for your email account which was set on MXRoute.
- Under Receiving mail settings click the advanced options button at the bottom of this section.
Make sure all options are unchecked and the default POP port is set to 110
- Sending mail settings:
- Enter the server name provided by SMTP2Go e.g. mail.smtp2go.com
- Under the Sending mail section click the advanced options button
- Make sure SMTP service requires secure connection (SSL) is unchecked
- Check the option Override default SMTP port and set it to '587'
- Check the option SMTP server requires authentication and log on using the username and password set in SMTP2Go
- Make sure the account ID is your email account ID/username (not your full email address).
- Save your account settings and test both sending and receiving an email within Outlook.
General Settings |
POP Settings |

SMTP Settings |
Hopefully everything should work!
This guide was checked and updated on 28th March 2023
Comments
Kearan85
03 November 2023
Hi! I just discovered your awesome website by browsing with Classilla on my trusty iMac G3 (OS9). Amazing to see I'm not alone using these good old machines. If my comment is in a wrong section, delete it. See you, Kearan
PermalinkGreystash - Admin
03 November 2023
Hi Kearan!
PermalinkI'm glad you've enjoyed it, and especially through Classilla! Thanks for visiting!
Wilhelmina
02 June 2023
Estoy muy agradecido por tu visión y entusiasmo al crear y mantener este blog. Significa mucho para mí y otras personas. colchones baratos leganes
PermalinkGreystash - Admin
05 June 2023
Você é muito bem-vindo! Estou feliz que você achou útil
PermalinkMitch
21 March 2023
Does this still work for you? I'm having connection failures with smtp2go.
PermalinkGreystash - Admin
28 March 2023
Hi Mitch,
Sorry for the delayed response. Yes I have been using the same account for the last three years and it's still working fine.
I went through the guide again and noticed that I had a few incorrect details like the SMTP server in the images. I made some updates and tested a new mail account which worked without issue.
Try going through the guide again and If you're still having trouble let me know and I can send you some screenshots of my setup.
PermalinkMitch
29 March 2023
Thank you for getting back to me. I finally got it going. Thank you so much! This is awesome!
PermalinkGreystash - Admin
29 March 2023
No problem! Glad to hear you got it working!
PermalinkPost a Comment